Introduction
Turning a medical device concept into a market-ready product is expensive, slow, and unforgiving. One misstep in development — a missed regulatory requirement, a design flaw caught late — can mean failed validation studies, full redesigns, or a complete restart that adds months and six figures to your budget.
Prototyping is where you catch those problems early — before they become costly. Each iteration tests your assumptions, surfaces design gaps, and refines the product against real-world constraints before you commit to production tooling.
This guide covers what medical device prototyping involves, the key development stages, common fabrication techniques including thermoforming, regulatory considerations, and how to choose a manufacturing partner that helps you reach market faster.
Key Takeaways
- Medical device prototyping validates design, functionality, and safety through physical or digital models before full-scale production
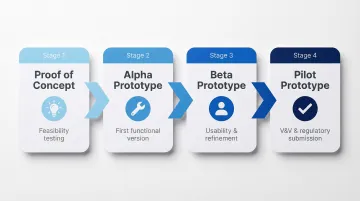
- Development typically moves through four stages: proof of concept, alpha, beta, and pilot prototypes, with each stage addressing specific risks
- Fabrication methods include 3D printing for rapid iteration, CNC machining for precision parts, and thermoforming for enclosures, housings, and near-production components
- FDA compliance must be planned from day one, not treated as an afterthought—prototypes serve as regulatory evidence under 21 CFR 820.30
- Working with a manufacturer experienced in both prototyping and production—like Hill Plastics, with 45+ years serving medical OEMs—reduces handoff risk and compresses time to market
What Is Medical Device Prototyping?
Medical device prototyping is the iterative process of creating physical or digital models to assess design, functionality, safety, and user experience before committing to full production. Unlike general consumer product prototyping, medical device development operates within a highly regulated environment where patient safety and regulatory compliance are paramount from the first iteration.
What sets medical device prototyping apart:
- Materials must meet ISO 10993 biocompatibility standards based on contact duration and tissue exposure
- Prototypes generate objective evidence for Verification and Validation (V&V) testing under FDA Design Controls (21 CFR 820.30)
- Design errors carry direct patient safety consequences, making thorough testing non-negotiable
- Materials must survive the final device's sterilization method — autoclave, gamma radiation, or ethylene oxide
These requirements play out differently depending on the device type. Common prototyping scenarios include:
- A foam mock-up of a surgical tool grip to evaluate ergonomics during simulated procedures
- A thermoformed polycarbonate enclosure for a portable diagnostic device, tested for drop resistance and chemical compatibility with hospital disinfectants
- A 3D-printed dental implant model used for pre-surgical planning and patient-specific anatomical fit
The Stages of Medical Device Prototyping
Medical device development follows a structured, stage-gated framework mandated by FDA Design Controls and ISO 13485 Clause 7.3. This approach reduces development risk by forcing design freezes and Design for Manufacturability (DfM) reviews early, preventing the exponential cost increase of late-stage changes.
Proof of Concept
This earliest stage validates that your core idea is technically feasible before committing real budget. Prototypes here are rough, low-fidelity models focused on one question: Can this actually work?
Proof-of-concept builds use readily available materials and basic fabrication methods. The goal is speed and low cost, not polish. These models test fundamental functionality:
- Does the mechanism operate as intended?
- Does the sensor detect the target signal?
- Can the device fit the required anatomical space?
Alpha Prototype
The alpha prototype is the first functional version of your device, built to test core features and gather initial feedback from engineers and potential users. This is where the first real technical challenges surface: component interference, assembly difficulties, battery life shortfalls, or ergonomic issues that weren't apparent in earlier stages.
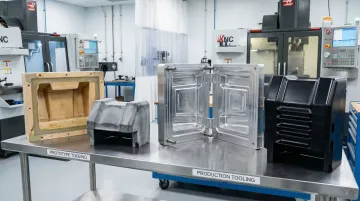
Alpha prototypes incorporate closer-to-final materials and manufacturing processes. At this stage, Hill Plastics often works with medical OEM clients using low-cost wood or polyurethane tooling for thermoformed enclosures — allowing rapid iteration without the expense of aluminum production molds.
Design modifications can be made directly to the wood pattern in weeks, not months. That speed matters when you're discovering component fit issues or ergonomic problems that only appear in a physical build.
Beta Prototype
Beta prototypes are refined versions where materials, user interface elements, and software (if applicable) are finalized. This stage centers on rigorous usability testing with real clinicians or patients in simulated clinical environments.
Human factors engineering (IEC 62366) must be integrated throughout the product lifecycle to minimize use-related risks. Beta testing reveals how actual users interact with your device — not how you assume they will. Key outcomes from this stage include:
- Identifying grip, labeling, or workflow issues before formal validation
- Confirming software and interface elements perform under real-use conditions
- Capturing documented user feedback to support regulatory submissions
Pilot Prototype
The pilot or pre-production prototype closely mirrors the final product in design, materials, and functionality. It serves three essential purposes:
- Verification and Validation (V&V) testing — Formal testing that confirms the design was built to spec (verification) and performs safely under real-world conditions (validation)
- Regulatory submissions — Documentation and test results from pilot prototypes form the core of your FDA 510(k) or PMA submission
- Production process planning — Pilot runs identify manufacturing challenges before full-scale launch, allowing process refinement
At this stage, manufacturers like Hill Plastics transition from prototype tooling to aluminum production molds using the validated master pattern, preserving exact design specifications and accelerating the path to commercial production.
Prototyping Techniques for Medical Devices
Selecting the right fabrication technique depends on your prototype's development stage, device complexity, required material properties, and budget constraints. The subsections below map each technique to the scenarios where it delivers the most value — helping you match method to milestone.
3D Printing
Additive manufacturing is widely used in early-stage medical device prototyping for its ability to rapidly produce complex geometries with minimal tooling cost. The global healthcare 3D printing market was valued at $7.4 billion in 2022 and is growing at 18.1% annually.
Best applications:
- Patient-specific anatomical models for surgical planning
- Complex internal structures impossible to machine
- Rapid iteration on casings, brackets, and ergonomic forms
- Custom implants and prosthetics
The FDA issued technical considerations for additive manufactured medical devices in 2017, outlining testing and characterization requirements. Several 3D-printed devices have received FDA clearance, including 3D Systems' VSP PEEK Cranial Implant.
Thermoforming and Vacuum Forming
Thermoforming is particularly well-suited for medical device enclosures, housings, and equipment shells — components requiring precise fit, smooth surfaces, and specific material properties like chemical resistance to hospital disinfectants.
Key advantages for medical devices:
- Low-cost prototype tooling — Wood or polyurethane patterns can be CNC-milled in weeks, keeping early-stage iteration affordable
- Medical-grade materials — PETG, polycarbonate, and polypropylene offer biocompatibility and sterilization compatibility
- Smooth surfaces — Essential for cleanability and infection control
- Scalability — The same master pattern transitions from prototyping to production aluminum molds
For medical OEMs focused on enclosures and housings, Hill Plastics supports this process end-to-end — from SolidWorks-driven prototype tooling through production — with the same manufacturing partner. Keeping design and fabrication under one roof preserves design intent and eliminates costly handoffs between vendors.
Sterilization compatibility by material:
| Material | Autoclave (Steam) | Gamma/E-beam | Ethylene Oxide |
|---|---|---|---|
| Polypropylene (PP) | Excellent | Needs stabilization | Excellent |
| Polycarbonate (PC) | Medical grades only | Some grades | Excellent |
| PETG | Avoid | Good | Excellent |
| HIPS | Avoid | Single-use only | Excellent |
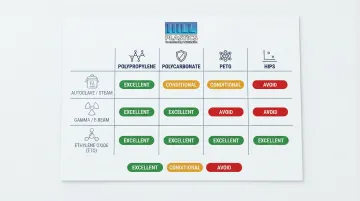
Source: RapidMade Sterilization Guide
CNC Machining
CNC machining is essential for high-precision prototypes in metal or hard plastic where tight tolerances are critical. Standard precision machining maintains tolerances of ±0.005 inches, with advanced capabilities down to ±0.0001 inches.
Common applications:
- Surgical instruments requiring sharp edges and precise dimensions
- Structural components for implantable devices
- Test fixtures for validation studies
- Metal prototypes for strength testing
CNC machining delivers superior surface finish and dimensional accuracy, making it the right choice for components that interface directly with tissue or require hermetic seals — applications where 3D printing's geometric freedom doesn't offset its surface quality limitations.
Injection Molding (Prototype Tooling)
Prototype or "soft" tooling makes injection molding viable for small batches of near-final parts needed for usability and regulatory testing — without committing to full production tooling costs upfront.
Soft tooling using aluminum or soft steel cuts lead times to 2-6 weeks compared to 6-12 weeks for hardened production molds, allowing teams to produce testable parts on a timeline that fits regulatory milestones.
When to use prototype injection molding:
- Final material performance data is required for V&V testing
- Molded features (threads, snaps, living hinges) must be validated
- Regulatory submission requires parts from the intended manufacturing process
- Small batch production (hundreds to low thousands of parts)
Note: For medical device enclosures and housings specifically, thermoforming often achieves comparable results at significantly lower tooling cost — worth evaluating before committing to injection mold tooling at the prototype stage.
Key Considerations and Challenges in Medical Device Prototyping
Cross-Disciplinary Integration
Medical device prototypes often incorporate mechanical, electronic, and software components, requiring tight collaboration between engineers from different disciplines. Inefficiencies in technology transfer and cross-functional coordination lead to duplicate work, miscommunication, and costly rework. Communication gaps between teams are a leading cause of development delays.
Best practice: Establish regular cross-functional design reviews at each prototype stage with documented decisions and action items.
Material Selection and Biocompatibility
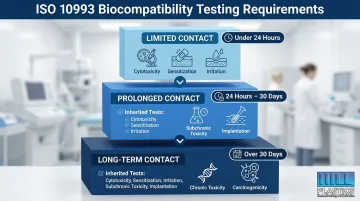
Selecting the wrong material at the prototype stage can invalidate testing results and force a complete restart. The FDA defers to ISO 10993-1 for biological evaluation of medical devices, with testing requirements based on contact duration:
- Limited (<24 hours) — Basic cytotoxicity, sensitization, irritation
- Prolonged (24 hours to 30 days) — Add subchronic toxicity, implantation
- Long-term (>30 days) — Add chronic toxicity, carcinogenicity
A common failure: prototyping with materials that cannot survive the final device's sterilization method. The FDA evaluates biocompatibility on the device in its "final finished form," including sterilization impacts.
Design for Manufacturing (DfM)
A prototype that functions perfectly in the lab but cannot be cost-effectively manufactured at scale is an expensive failure. Integrating DfM principles early reduces production costs, improves quality, and accelerates time-to-market.
Critical DfM considerations:
- Can this part be reliably produced in volume?
- Are tolerances achievable with standard manufacturing processes?
- Have assembly requirements been minimized?
- Are materials available from multiple suppliers?
Cost and Timeline Management
Underestimating iterations is one of the most frequent—and costly—mistakes in device development. DfM helps contain scope, but budget planning still needs to account for:
- Tooling costs at each prototype stage
- Component lead times for specialized materials
- Regulatory testing delays that compress downstream schedules
Low-cost prototype tooling can absorb much of this pressure. Wood or polyurethane patterns for thermoformed parts, for example, allow engineers to modify a master pattern directly when designs change, then transition it to production molds once validated. Hill Plastics uses this approach to help medical OEMs reduce iteration costs without sacrificing design flexibility.
Regulatory Compliance and FDA Approval in Prototyping
Regulatory planning cannot wait until your final prototype is ready. Your device's risk classification drives your entire regulatory pathway — and that determines what testing your prototypes must support from day one.
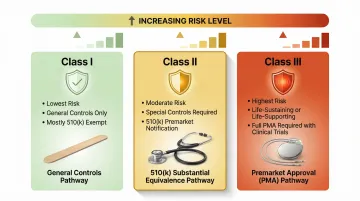
FDA Device Classifications
- Class I (General Controls) — Lowest risk devices. Most are exempt from premarket notification. Examples: manual surgical instruments, tongue depressors
- Class II (Special Controls) — Moderate risk. Most require 510(k) premarket notification demonstrating substantial equivalence to a legally marketed predicate device
- Class III (Premarket Approval) — Highest risk devices that support or sustain life. Require extensive clinical trials and performance data through the PMA process
Under the Medical Device User Fee Act, the FDA aims to review 90% of 510(k) submissions within 90 days.
Verification and Validation (V&V) Testing
V&V is the formal process prototypes must pass before regulatory submission:
- Verification — confirms the design output matches the design input specifications
- Validation — confirms the finished device performs safely and effectively under real-world conditions
Testing covers materials characterization, biocompatibility assessment, electrical safety, electromagnetic compatibility (EMC), and human factors validation.
Design History File (DHF)
Under 21 CFR 820.30, manufacturers must document all design and development activities in a Design History File. This includes:
- Design inputs and outputs
- Verification and validation protocols and results
- Design reviews and approvals
- Risk management records
- Prototype test results and evaluations
Treat DHF documentation as ongoing work, not a post-development task. Every prototype used for testing must be traceable in your DHF.
How to Choose the Right Prototyping Partner
Selecting the right manufacturing partner can make or break your medical device development timeline. Evaluate potential partners on these criteria:
- Confirm they can work with biocompatible plastics and metals, and that they understand sterilization compatibility requirements
- Ask whether they've supported FDA submissions and whether they maintain ISO 13485 certification for medical device quality management
- Look for in-house CAD capabilities (SolidWorks is a strong indicator) and a willingness to provide DfM feedback early
- Determine whether they can handle both low-volume prototyping and full production runs — switching manufacturers mid-development introduces unnecessary risk
- Ask for references from similar medical OEM projects, not just general manufacturing work
When a single partner can carry a design from low-cost prototype tooling through full production, it protects design intent and cuts time to market. Hill Plastics has done exactly that for medical industry clients for over 45 years — starting with thermoformed prototype enclosures using low-cost tooling, then transitioning to production via the validated master pattern for aluminum mold creation.
Frequently Asked Questions
What are the 5 stages of prototyping?
The five stages are: proof of concept (feasibility testing), alpha prototype (first functional version), beta prototype (refined design for usability testing), pilot prototype (pre-production for V&V and regulatory submission), and production scaling. Some frameworks use four stages by combining feasibility into the alpha phase.
What are the four types of prototyping?
The four main types are: proof-of-concept (tests technical feasibility), functional/alpha (validates core features and engineering), presentation/aesthetic (evaluates visual design and user interaction), and pre-production/pilot (final validation before manufacturing).
What are the benefits of prototype tooling?
Prototype tooling uses lower-cost materials like wood, polyurethane, or soft aluminum to produce testable parts quickly and inexpensively before committing to expensive production tooling. This approach reduces financial risk during iteration and allows design modifications in weeks rather than months.
What is the difference between prototype and NPI?
Prototyping validates design and functionality through iterative testing. New Product Introduction (NPI) is the structured process of transitioning that validated design into scalable manufacturing with established quality controls, supplier relationships, and production procedures — it begins after prototype approval.
How does a medical device get FDA approval?
FDA approval depends on device classification. Class II devices typically require a 510(k) premarket notification demonstrating substantial equivalence to a predicate device . Class III devices require more rigorous Premarket Approval (PMA) with clinical evidence demonstrating safety and effectiveness.
What is the medical application of rapid prototyping?
Rapid prototyping enables surgical planning models, custom implants, device housings, prosthetics, and diagnostic equipment casings. 3D printing compresses iteration cycles and reduces time to clinical testing, with successful applications including bioresorbable airway splints for pediatric patients.