This guide is for OEM engineers, product developers, and entrepreneurs in aerospace, medical, telecom, and industrial manufacturing who have a working prototype and need to understand what it takes to scale it into reliable, repeatable production runs. You'll learn the full prototype-to-production process—what each stage involves, the critical decisions that shape outcomes, and the factors that most commonly cause this transition to fail.
Key Takeaways
- The path runs through three phases: prototyping (form and function), low-volume production (manufacturability), and serial production (repeatable, cost-efficient output)
- Prototypes validate design intent; production parts must be manufactured consistently at scale under cost and time constraints
- DFM bridges the gap between prototype and production and prevents most costly failures
- Tooling choice drives both speed and unit cost — choosing wrong here is expensive
- Most transitions fail when teams rush or skip DFM, pre-production testing, or early manufacturing engagement
What Is the Prototype-to-Production Process?
The prototype-to-production process is the structured journey a product takes from initial proof-of-concept through design refinement, tooling, testing, and finally into consistent, repeatable manufacturing output.
A prototype tests fit, form, and function—often using simpler materials and temporary tooling. A production part must meet repeatable dimensional tolerances, material specifications, and cost targets across hundreds or thousands of units. The distinction matters because what works for one prototype rarely works for 10,000 production units without significant modification.
The process typically evolves through three distinct phases, each serving a different purpose:
- Prototyping — Validates fit, form, and function using lower-cost tooling and materials
- Low-volume / bridge production — Refines design and process before committing to full tooling investment
- Serial production — Consistent, repeatable output at volume with locked-in specs and quality controls
Understanding where your product sits in this progression helps you make smarter decisions about tooling investment, material selection, and quality control before costly problems surface.
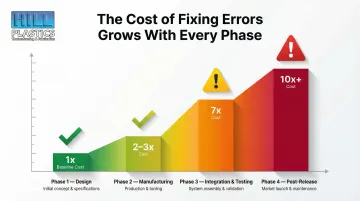
According to industry standards, the cost to fix errors escalates dramatically as projects mature. Fixing a requirements error during design costs 3–8 units, but the same fix during manufacturing costs 7–16 units, and during integration and testing it jumps to 21–78 units. That cost curve is why front-loading your design validation — before tooling is cut and production begins — is one of the highest-leverage decisions in any manufacturing project.
The Key Stages of Moving from Prototype to Production
Understanding this stage-based framework helps manufacturers make smarter decisions about tooling investment, material selection, and quality control. Rushing any stage increases the risk of discovering critical problems after tooling investment is already locked.
Stage 1: Concept Prototyping
Concept prototyping proves design intent—creating a physical object that can be evaluated for fit, aesthetics, and basic function. Materials and tooling at this stage are deliberately low-cost and fast.
Common prototyping methods:
- 3D printed molds turn around in under 48 hours at $400–$1,500, suitable for dozens to hundreds of cycles
- Urethane/epoxy board delivers short lead times (3–6 weeks) for low hundreds of parts
- Wood/MDF is the most economical option, ideal for initial validation runs under 50 pieces
Hill Plastics offers exactly this kind of low-cost prototype tooling approach, using wood or polyurethane tooling to create master patterns CNC-milled to print specifications. A master pattern can typically be produced in just a few weeks depending on design complexity, allowing clients to validate designs affordably before committing to production tooling.
The Society of the Plastics Industry (SPI) classifies prototype tools as Class 105, designed for under 500 cycles, while production tools (Class 101-103) use temperature-controlled aluminum or steel for 100,000 to over 1,000,000 cycles.
Stage 2: Design Refinement and DFM Review
After initial prototyping, the design is reviewed specifically for manufacturability. DFM analysis simplifies part geometry, locks in material choices, and flags any features that would be difficult or expensive to replicate at volume.
This stage typically produces one or more refined iterations before the design is frozen. Changes at this point are still low-cost — modifications to wood or polyurethane prototype tooling require minimal time and expense compared to reworking production tools later.
Stage 3: Low-Volume / Bridge Production
Low-volume production serves as the validation bridge between prototype and full production. Small batches—typically tens to a few hundred parts—are manufactured using near-final tooling and production materials.
Bridge manufacturing allows businesses to produce smaller batches for product testing, pre-sales, or market validation before committing to expensive mass-production tooling. This phase confirms the process is repeatable, quality standards are consistently met, and the manufacturing partner can hit required cycle times and tolerances.
Soft tooling (aluminum or high-strength alloys) is typically used for production volumes ranging from a few hundred to several thousand parts, with aluminum bridge tools ready in two to three weeks.
Stage 4: Full-Scale / Serial Production
Once bridge production confirms your process is dialed in, serial production brings everything together: final aluminum or steel tooling, optimized cycle times, and established quality control checkpoints.
The precision and repeatability required at this stage make all earlier preparation essential. Without proper DFM and pre-production validation, defect rates and rework costs escalate quickly.
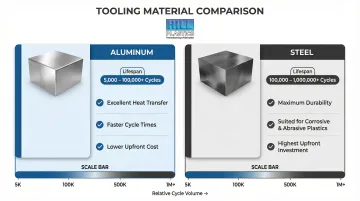
Tooling lifespan benchmarks:
| Tool Material | Expected Lifespan (Cycles) | Characteristics |
|---|---|---|
| Aluminum | 5,000 to 100,000+ | Excellent heat transfer, faster cycle times, lower cost |
| Steel | 100,000 to 1,000,000+ | Maximum durability, suited for corrosive/abrasive plastics |
Design for Manufacturing: Bridging Prototype and Production
Design for Manufacturing (DFM) is the practice of reviewing and modifying a product's design to ensure it can be produced consistently, efficiently, and cost-effectively using the intended manufacturing process.
For thermoforming, this includes considerations like draft angles, wall thickness uniformity, undercuts, and material draw ratios.
Common DFM Adjustments for Thermoforming
Geometry simplification targets features that complicate tooling or cause inconsistent forming:
- Eliminate undercuts that would require secondary operations
- Standardize wall thicknesses to prevent thinning in deep-draw areas
- Simplify part geometry to reduce tooling complexity
Draft angles vary by mold type and surface finish:
- Female molds require 1.5°–2° of draft
- Male molds require 4°–6° (up to 7°+ for nesting parts)
- Textured surfaces need at least 1° additional draft per 0.0002 inches of texture depth
Draw ratios determine whether a design can form cleanly without wall thinning:
- Standard forming targets a 1:1 draw ratio
- Ratios above 3:1 require thicker initial sheets, design modifications, or plug-assist forming
Material Selection During DFM
Material selection is critical during DFM. A material that worked well for a CNC-machined or 3D-printed prototype may not be suitable for thermoforming at volume due to cost, formability, heat resistance, or regulatory requirements.
Material selection matrix for regulated industries:
| Industry | Material Grade | Certifications | Key Properties |
|---|---|---|---|
| Medical | Covestro Makrolon Rx Series (PC) | ISO 10993, Biocompatible | Radiation/EtO sterilizable, lipid-resistant |
| Medical | Plaskolite VIVAK (PETG) | FDA food contact, ISO 10993 | Deep draws, high impact strength |
| Aerospace | SABIC ULTEM 1000/9075 (PEI) | FAR 25.853, UL94 V-0 | High heat resistance, inherently flame retardant |
| Aerospace | SEKISUI KYDEX 100/5555 | FAR 25.853 (a/d) | Flame/smoke compliance, impact resistance |
| Outdoor/Telecom | Trinseo MAGNUM (ABS) | UL94 V-0, UV-stabilized | Weatherability, stable base color |
Material choice also affects tooling decisions. Prototype molds made from 3D-printed polymer are far less thermally conductive than production aluminum tooling — roughly 0.2 W/m-K versus aluminum's ~167 W/m-K — which translates to cycle times 25% to 70% longer for printed tools. This gap matters when projecting production throughput during the DFM review.
The Role of a Bill of Materials (BOM)
As the design is refined through DFM, every component, material specification, tolerance, and assembly instruction should be documented and kept current. For thermoformed parts, this means capturing sheet thickness, material grade, grain direction (where applicable), and secondary operations like trimming or bonding.
A well-maintained BOM prevents mismatches between what engineering specified and what purchasing orders — a common source of production delays and scrap at first article.
Early Collaboration with Manufacturing Partners
Manufacturers with deep thermoforming experience can spot production problems in a design before tooling is ever cut — saving significant time and cost downstream. Hill Plastics' engineering team works with customers early in the process, using SolidWorks and CNC trimming infrastructure to evaluate designs for formability, material fit, and production feasibility.
Catching a draft angle problem or an unsuitable material grade at the DFM stage costs a conversation. Catching it after tooling is built costs weeks.
Key Factors That Affect the Prototype-to-Production Transition
Tooling Material and Investment Level
For thermoformed parts, prototype tooling can be made from wood or polyurethane at low cost to validate design intent, while production tooling typically uses aluminum or steel for durability across high-volume runs.
Cost comparisons:
- 3D Printed Molds: $400–$1,500
- Thermoforming Aluminum Tools: $5,000–$50,000
- Injection Molding Tools (for context): $20,000–$150,000+
The aggregate part cost, including tooling, is lower for thermoforming if production volumes are below 3,000 to 5,000 parts. Beyond 5,000 parts, injection molding becomes more competitive as tooling costs are amortized over larger quantities.
Committing to expensive production tooling too early—before DFM is complete—is one of the most costly mistakes in this process.
Production Volume and Machine Capacity
Required annual quantity shapes nearly every decision: machine size, cycle time targets, tooling configuration (single vs. rotary station), and labor requirements all change with volume.
Rotary thermoformers deliver 2.8 to 3 times the parts-per-hour output of single-station machines while utilizing equal oven electrical consumption. For runs exceeding 3,000–5,000 parts annually, that output difference directly affects whether a single-station or rotary setup makes financial sense.
Hill Plastics operates eight thermoforming machines ranging from 2'x3' to 5'x9' for flexible prototype and low-volume production, plus a 4'x7' rotary thermoforming machine engineered specifically for high-volume runs with cycle times 2.5 times faster than standard single-station machines.
Material Behavior at Production Scale
Thermoplastic sheet materials that perform well at prototype quantities may present challenges at production scale due to supplier lead times, sheet thickness tolerances, or forming behavior.
Two specific risks to plan for:
- Sheet thickness tolerances vary significantly by gauge — KYDEX tolerances range from ±18.0% at 0.028" nominal down to ±5.0% at 0.375" thickness
- Roll deflection during extrusion can create a 20% thickness variation in thin-gauge sheet, causing uneven forming and local thinning at production scale
These material inconsistencies are precisely what production-stage quality control must catch before scrap rates climb.
Quality Control Systems
Transitioning to production requires defined inspection criteria, in-process quality checkpoints, and traceability. Unoptimized thermoforming processes typically experience scrap rates of 5–15%, but automated process controls and CNC machined molds can cut that figure by 15–25% through improved heating consistency and tighter mold dimensions.
Hill Plastics has implemented a custom quality control system that monitors production progress as parts pass through all stages—from thermoforming and vacuum forming operations through CNC trimming, assembly, and final verification—ensuring production parts meet appearance and print specifications.
Common Mistakes and Misconceptions in the Prototype-to-Production Process
Assuming a Working Prototype Equals a Production-Ready Design
Treating a working prototype as a production-ready design leads manufacturers to commit to tooling and materials before DFM is complete—only to discover the design can't scale without expensive modifications.
The real cost shows up fast: rework, scrapped tooling, and schedule delays. Fixing errors during manufacturing costs more than twice what correction during design would have—and catching problems during integration and testing costs seven times more.
Delaying Supplier/Manufacturing Engagement
Many product developers treat manufacturing partners as vendors to be brought in only after the design is finalized. Involving a thermoforming manufacturer early changes that dynamic. They can:
- Flag producibility issues before they become tooling problems
- Recommend material alternatives suited to your production volume
- Size tooling appropriately so first-run costs don't spiral
Manufacturers with experienced engineering teams, such as Hill Plastics (whose staff carry a minimum of 20 years of industry experience), can catch these problems during design review rather than after production has started.
Believing Low-Volume Production Is Just "Small-Scale Full Production"
Low-volume production serves a distinct purpose: validating the process, not just the product. Teams that skip this phase and jump directly from prototype to full production runs often discover process instability, inconsistent part dimensions, or assembly fit issues only after large quantities of scrap have been produced.
Bridge production uses near-final tooling and production materials to prove repeatability before committing to full production volumes.
Frequently Asked Questions
What is prototype to production?
Prototype to production is the full process of evolving a product from an initial physical proof-of-concept through design refinement, manufacturability optimization, tooling, and testing until it can be manufactured consistently and cost-effectively at the required scale.
How to take a product from prototype to production?
Start by validating your design with a prototype, then apply DFM principles to refine it for the manufacturing process. From there, build and test low-volume production parts using near-final tooling and materials, finalize production tooling, and scale to full production with quality checkpoints in place.
What are the stages of taking a prototype to production?
There are four core stages:
- Concept prototyping — validates design intent
- DFM-driven design refinement — optimizes for manufacturability
- Low-volume/bridge production — proves process repeatability
- Full-scale serial production — achieves consistent, cost-efficient output at volume
What is the difference between prototype and production?
A prototype is built to test and validate design intent using faster, lower-cost methods and materials. A production part must be manufactured repeatably, at scale, within tight cost and tolerance requirements using the final production process and materials.
What are the types of prototypes?
The three main types are:
- Concept/appearance prototypes — validate aesthetics and overall form
- Functional prototypes — test fit, function, and structural performance
- Pre-production prototypes — use near-final materials and processes to confirm manufacturability before full tooling investment
What are the scales of production?
The three main scales are low-volume/bridge production (tens to hundreds of parts for market testing or process validation), medium-volume production, and high-volume/serial production (thousands to millions of units per year). The right scale depends on market demand and where the product sits in its lifecycle.