Introduction
Your production mold is cut, the first batch rolls off the line, and then you discover the gate placement is wrong — or the part simply doesn't fit the assembly. Catching a design flaw after committing to hardened steel tooling can cost $10,000+ in rework and push your timeline back weeks. According to NASA/Boehm cost-of-change models, fixing an error during the manufacturing phase costs 16 times more than catching it during the requirements phase — and escalates to 29 times or more once products reach operations.
Prototype tooling eliminates this risk by letting teams produce and test real parts using production-grade materials before committing to expensive production tooling.
This guide covers what prototype tooling is, the types available, when to use it, and how to choose the right approach for your project.
Key Takeaways
- Prototype tooling creates low-cost molds to test parts before investing in full production tooling.
- Two main categories exist: direct tooling (CNC-machined or 3D-printed molds) and indirect tooling (using master patterns to cast molds).
- It's significantly faster and cheaper than hardened steel production tooling, though it supports lower volumes.
- Key benefits: rapid design iteration, early flaw detection, and functional testing with real production materials.
- Best suited for new product development, regulated industries needing validation, or any project where catching design flaws early saves significant cost.
What Is Prototype Tooling?
Prototype tooling is the process of creating molds, dies, or other manufacturing tools using less expensive materials and faster methods specifically to produce prototype parts or small batches for testing and validation—not for mass production. These tools allow engineers to confirm geometry, tolerances, and material behavior before committing to costly hard tooling.
The terminology often shifts based on context. Prototype tooling is also called "rapid tooling" when speed is the priority or "soft tooling" when referring to the less durable materials used (aluminum, wood, polyurethane, or silicone rubber). Regardless of the name, the purpose is the same: bridge the gap between a digital CAD design and final production tooling.
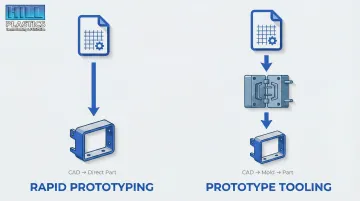
How Prototype Tooling Differs from Rapid Prototyping
Many engineers confuse prototype tooling with rapid prototyping, but they serve different purposes:
- Rapid prototyping (e.g., 3D printing, CNC machining) produces the part directly from CAD data.
- Prototype tooling produces a mold or tool that then creates the part using traditional manufacturing processes like thermoforming or injection molding.
This distinction matters because parts made through prototype tooling more closely replicate the final production process and materials. A thermoformed part made from an aluminum prototype mold will behave like the production version, giving engineers reliable data on how the finished part will look, fit, and function—well before hard tooling costs are on the table. A 3D-printed surrogate can approximate geometry, but it won't replicate the material behavior and wall consistency you get from an actual forming process.
Types of Prototype Tooling
Choosing the right type of prototype tooling depends on part complexity, production volume goals, and desired material properties. The two primary categories are direct and indirect tooling.
Direct Prototype Tooling
In direct tooling, the mold or die is created straight from a CAD model using processes like CNC machining or 3D printing—no intermediate master pattern is needed. This is the fastest path from concept to a usable tool.
Best use cases:
- Simpler geometries with minimal undercuts
- Extremely short timelines (days to 2-3 weeks)
- Low part quantities (under 500 units) where speed matters more than tool longevity
Indirect Prototype Tooling
Indirect tooling involves first creating a master pattern, which is then used to produce the mold or tool. For example, you might 3D print or CNC-machine a master pattern, then cast a silicone or urethane mold around it. This adds steps but enables more durable tooling and greater design detail.
Best use cases:
- Slightly higher prototype volumes (50-500 parts)
- Parts needing complex undercuts or zero-draft geometries
- Situations where multiple molds from one master pattern spread costs across several iterations
Soft Tooling vs. Hard Tooling
| Soft Tooling | Hard Tooling | |
|---|---|---|
| Materials | Silicone, aluminum, polyurethane, mild steel | Hardened steel (P20, H13) |
| Lead Time | Days to a few weeks | 10–16 weeks |
| Cost | 40–60% less than steel tooling | Significantly higher upfront investment |
| Shot Life | 10,000–50,000+ shots (aluminum) | 250,000–1 million+ shots (H13) |
| Best For | Prototype runs, thermoforming, lower volumes | High-volume production with tight tolerances |
Soft tooling is the standard choice for prototype work — aluminum molds machine 3–5 times faster than steel and keep costs manageable during early development. Hard tooling makes sense once a design is finalized and production volumes justify the investment.
Prototype Tooling vs. Production Tooling
Understanding the trade-offs between prototype and production tooling helps you make informed decisions.
| Factor | Prototype/Soft Tooling | Production/Hard Tooling |
|---|---|---|
| Cost | $1,495 to $8,000 | $25,000 to $100,000+ |
| Lead Time | Days to 4 weeks | 10 to 16 weeks |
| Materials | Aluminum, wood, polyurethane, mild steel | Hardened steel (P20, H13) |
| Tool Life | 5,000 to 50,000 shots (aluminum) | 100,000 to 1M+ shots |
| Tolerance Precision | Moderate (±0.005" typical) | High (±0.002" or tighter) |

Cost Differences
Prototype tooling uses less expensive materials (aluminum, wood, polyurethane) and simpler machining processes. Simple aluminum prototype molds typically start around $1,495 to $3,000, while production-grade hardened steel molds range from $25,000 to well over $100,000 depending on complexity and cavitation.
Lead Time Differences
Prototype tools can typically be produced in days to a few weeks, while production tooling often takes 10-16 weeks. For early-stage development, this time savings directly accelerates the development cycle and cuts time to market.
Bridge Tooling: The Middle Ground
Prototype tooling is a validation step, not a permanent substitute for production tooling. Bridge tooling (or development tooling) fills the gap between the two, supplying parts for early market release or clinical trials while final production tooling is being finalized.
Aluminum bridge tooling can deliver first articles in 2-3 weeks and support 10,000 to 50,000 parts — giving teams enough runway to capture early revenue before steel molds are ready.
Key Benefits of Prototype Tooling
Risk Reduction
Catching design flaws during the prototype stage costs a fraction of what it would after investing in production tooling. Common issues revealed through prototype tooling include:
- Poor fit or incorrect tolerances
- Material flow problems or uneven wall thickness
- Weak features or stress concentrations
- Surface defects or texture inconsistencies
Engineering changes after a production mold is cut typically cost $2,000–$8,000 per modification and require 2-4 weeks of delay. A $4,000 prototype tool that catches three design issues can save $10,000+ in production mold rework.
Faster Iteration
Because prototype tools are faster and cheaper to modify, engineering teams can run multiple design cycles in the time it would take to produce one production tool. Wood or polyurethane patterns can be adjusted in days; aluminum molds can be modified in 1-2 weeks. That speed compounds — three design iterations in six weeks often produce better outcomes than a single rushed production mold.
Faster iteration also sets the stage for more reliable validation — which brings production-grade materials into the picture.
Functional Testing with Production Materials
Parts produced through prototype tooling can use production-grade materials — ABS, polycarbonate, HDPE, PETG — so test results for strength, fit, and thermal performance reflect actual behavior, not estimates from 3D-printed stand-ins. For regulated industries such as medical devices or aerospace components, this distinction is critical for compliance testing.
Prototype Tooling Materials and Processes
The right material depends on the number of prototype parts needed and the requirements of the molding process.
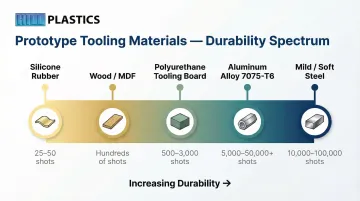
Material Spectrum (Least to Most Durable)
- Silicone rubber: 25-50 shots, ideal for urethane casting
- Wood or MDF: Hundreds of shots, common in low-pressure thermoforming
- Polyurethane tooling board: 500-3,000 shots, versatile for thermoforming and compression molding
- Aluminum alloy (7075-T6): 5,000-50,000+ shots, standard for injection molding and pressure forming
- Mild/soft steel: 10,000-100,000 shots, bridge tooling applications
Thermoforming-Specific Materials
For thermoforming and vacuum forming applications specifically, wood and polyurethane are widely used as low-cost tooling materials. Vacuum forming operates at ultra-low pressures (~14.7 psi), while pressure forming reaches only 30-150 psi—far less than injection molding's 5,000-20,000+ psi. This makes wood and polyurethane practical and cost-effective choices.
Hill Plastics uses this approach to deliver prototype thermoformed parts to OEM manufacturers and entrepreneurs in as little as a few weeks, using CNC-machined wood or polyurethane master patterns that can be produced in just a few weeks.
3D-Printed Molds
3D printing now produces functional thermoforming molds in 1–3 days, cutting prototype lead times significantly. High-temperature photopolymers like Formlabs Rigid 10K Resin (HDT 218°C) and Stratasys ULTEM 1010 (HDT 214°C) can produce functional thermoforming molds in 1-3 days. These printed molds successfully thermoform thick polystyrene and ABS sheets for 20-50 cycles, though their low thermal conductivity requires longer cooling times between cycles.
CNC Machining
Where 3D-printed molds prioritize speed, CNC machining prioritizes precision and longevity. It's the most common production method for prototype molds—especially aluminum tooling—and delivers tight tolerances, excellent surface finishes, and fast design modifications. For thermoforming applications, CNC-machined aluminum molds are a practical step up when you need more than 50 cycles or tighter dimensional control.
When Does Prototype Tooling Make Sense?
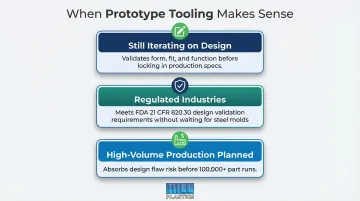
Clear Yes Scenarios
- Still iterating on design — Prototype tooling validates form, fit, and function before you lock in wall thickness, draft angles, or surface finishes.
- Operating in a regulated industry — FDA 21 CFR 820.30 requires design validation on "initial production units, lots, or batches, or their equivalents." Prototype tooling lets medical and aerospace manufacturers produce compliance-ready units without waiting for final steel molds.
- Planning a high-volume run — At 100,000+ parts, a single design flaw discovered after tooling can mean tens of thousands in rework. Prototype tooling absorbs that risk before it compounds.
When You Can Skip It
- Simple, proven geometry — A basic flat tray with no undercuts and minimal tolerances, based on a well-established design, may not justify the added tooling step.
- Very low lifetime volumes — Under 500 total parts, 3D printing or direct CNC machining is usually more economical than creating even a prototype mold.
- Already-validated designs — If 3D-printed prototypes have confirmed design intent through functional testing and the geometry is straightforward, moving directly to production tooling is a reasonable call.
Turnkey Support Accelerates Development
For manufacturers who need both design assistance and prototype thermoforming in one place, a turnkey partner can cut weeks off the development timeline by eliminating handoffs between separate vendors. Hill Plastics' engineering team supports customers from material selection and design validation through prototype production, using SolidWorks to carry designs directly from CAD into finished thermoformed parts.
Frequently Asked Questions
What is prototype tooling?
Prototype tooling is the creation of low-cost molds or dies to produce test parts before committing to full production tooling. It uses materials like aluminum, wood, or polyurethane to validate designs quickly and affordably — also called rapid or soft tooling.
What is the difference between production tooling and prototype tooling?
Prototype tooling uses less durable, lower-cost materials — aluminum, mild steel, or polyurethane — and supports limited production volumes. Production tooling uses hardened steel (P20, H13) built for high-volume, long-run manufacturing with tighter tolerances and tool life exceeding 100,000 shots.
What tools are used for prototyping and prototype molding?
Common prototype tooling options include:
- CNC-machined aluminum molds
- 3D-printed high-temperature resin molds
- Silicone rubber molds for casting
- Wood and polyurethane tooling (standard in thermoforming)
- Mild steel soft tools for higher-volume bridge production
How much does it cost to have a prototype made?
Costs vary based on part complexity and tooling material. Simple aluminum injection molds start around $1,495 to $3,000, while more complex soft tooling ranges from $3,000 to $8,000. Production-grade hardened steel molds cost $25,000 to $100,000+ depending on cavitation and complexity.
What is production tooling?
Production tooling consists of hardened steel molds or dies built for commercial-scale, high-volume manufacturing with tight tolerances, long tool life (100,000 to 1M+ shots), and multi-cavity capability. These are designed for maximum durability and lowest per-part cost at scale.
What are the four types of prototypes?
The four common prototype types are proof-of-concept, functional, visual/presentation, and pre-production. Prototype tooling applies most directly to functional and pre-production prototypes, where parts need to perform like final production units.